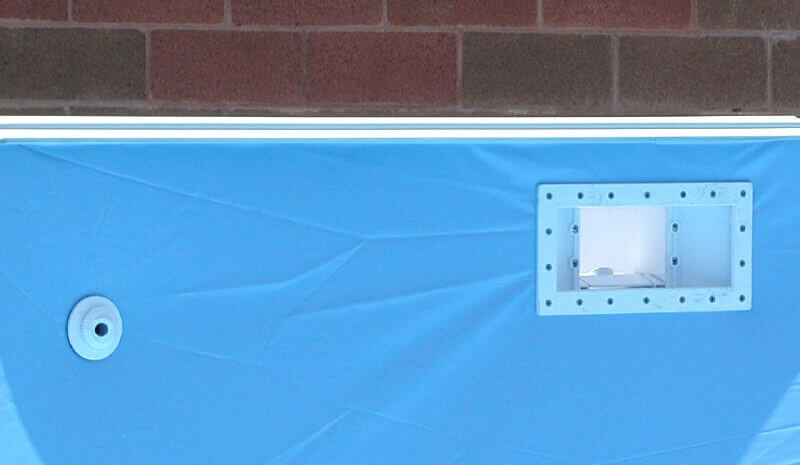
Above Ground Pool Skimmer Installation
How To Install It Correctly
Are you ready to do an above ground pool skimmer installation? OK, here goes.
Installing a skimmer on an above ground pool is best done when the water level is a few inches below the skimmer opening. This makes sure the liner is set and will not pull out of the skimmer or wind up short at another area of the pool.
There is no better way to ruin a liner than to cut the skimmer hole too soon and find that the liner was not set correctly. Hold off on this until you are positive the pool was set up correctly and the liner fits like it should.
One way to tell if the pool is set up correctly is to take a tape measure and measure from the top rail to the water in several places around the pool. You should be well within an inch on all of your readings.
So, your pool is level, and everything looks good, and you are happy with the installation. Now it's time to install the skimmer and hook up the filter, then you can finish filling it and start it up.
If you are installing a used pool or installing a new liner in your existing
pool it's a good idea to consider new
above ground pool skimmer gaskets![]() (#ad)
.
(#ad)
.
Start the skimmer installation by poking two holes through the liner. Do this from outside the pool, using the top corner screw holes in the wall as guides.

Most skimmers these days come with butterfly gaskets. This should be installed at this time. It goes over the sidewall only, taking your time to line up all of the screw holes.
Take the skimmer faceplate and insert two skimmer screws in the top holes, corresponding with the holes in the liner. Place the faceplate inside the pool and poke the screws through the liner. This should hold the skimmer faceplate in position allowing you to grab the skimmer and get it in position.
You will need a screwdriver in one hand and the skimmer in the other. Hold the skimmer up to the screws with one hand and start the screws, using the screwdriver, with the other hand. These screws should be started enough to hold the skimmer in place but not tight at this point. You can now do the same thing with a couple of bottom corner screws.
You now have four skimmer screws in place, loosely. Check the gasket and make sure it is still aligned correctly. It is now OK to insert the rest of the screw and tighten as you go.
Only after all the skimmer screws are in place and tight do I cut the opening for the skimmer. With a razor knife, from inside the pool, using the faceplate as a guide, cut the liner out of the skimmer opening. Be careful not to cut the gasket when doing this, it's easy to do. Keep the liner that you cut out, it makes the best patch material if you ever get a hole that needs repaired.
There are still many skimmers out there that use a two piece gasket. The installation for these is about the same. Hang the faceplate and one gasket on the inside of the pool using the two top corner screws. The outside gasket should be able to hang on the two screws poking through the side wall. Again, with a skimmer in one hand and a screw driver in the other you can align the holes and start the top screws. Go to the two corner bottom screws and check the gaskets before finishing with all of the screws.
The reason for the serpentine gasket is to protect the exposed surface of the sidewall from rust. If you are using a two piece gasket set you can do the same thing by coating this exposed surface with clear fingernail polish. If you closely examine the skimmer opening you will find it is not coated the same as the inner or outer walls. This does create a potential for rust, be aware of it and take the simple precautions to prevent it.
When you finish filling the pool check the skimmer for leaks. These do happen on occasion, even for us professionals. If it leaks, start by tightening all of the screw just a little bit more. If that does not work you need to loosen up all the screws and readjust the gasket. Sometimes the gasket, or gaskets, is, or are, not set just right. They can usually be adjusted and when the screws are once again tight the leak is gone.
Ask the Pool Pro any question you may have about above ground pools.